
mission accomplished!
the girls bathroom is DONE.
last fall, i was contacted by wendy hyde of the shabby nest to see if she could feature a room in my house for a book that she is writing. of course i said "YES!". i thought i was going to be able to have this bathroom and charlottes room done by then, but of course by the time january rolled around, i hadn't even started on either. ei-yi-yi!
i made a list of all the items that needed to be purchased and projects that needed to get done, for each space, and quickly realized that i was going to have to pick one room to focus on. i picked this bathroom. if you want to see the design plan that i made for this room, click here. (oh, you can also see what the room looked like just one short week ago!)
the first project i wanted to share from this room is this bathtub valance:

it may look like a super complicated and expensive project, but with some basic tools, it is actually pretty easy to do your self!
here is what i used for this project:
*some wide/long paper (i used some leftover paper we used to cover our hardwood floors during construction. it was some sort of thick craft paper)
*scissors
*pencil (and a string if you are making curves)
*a square
* tape measure
*tape (if making a contrast band)
*paint--primer + the finished color
*MDF
*sandpaper
*jig saw
something to secure your valance to the wall/ceiling. we used a ail gun, but you could also use L brackets
the first thing i did was to figure out the shape that i wanted to make my valance. i decided on this one:

i took some measurements of the bathtub opening and transferred them onto my paper.

this is what i ended up with for the rough/first round template:

using a string and a pencil, i made the curves neater.

there were only three curves on my design, and they were rather large, but if i had chosen a design with a scalloped bottom or smaller curves, i could have easily used a large bowl to trace the curves. instead, my homemade "compass" worked great.

once i had my rough template looking the way i wanted it to, i measured the places where the major intersections were, and transferred those markings to a new sheet of paper. (for instance, the place where the bottom curve met the first straight line, and where the curves on the end were.)

using the factory edge of the paper as a guide, i used a square to draw lines down and across to figure out where my major intersections were, and then drew in all of the straight lines. i used the pen and string to get my curves nice and neat. i only did this for one half of the template.
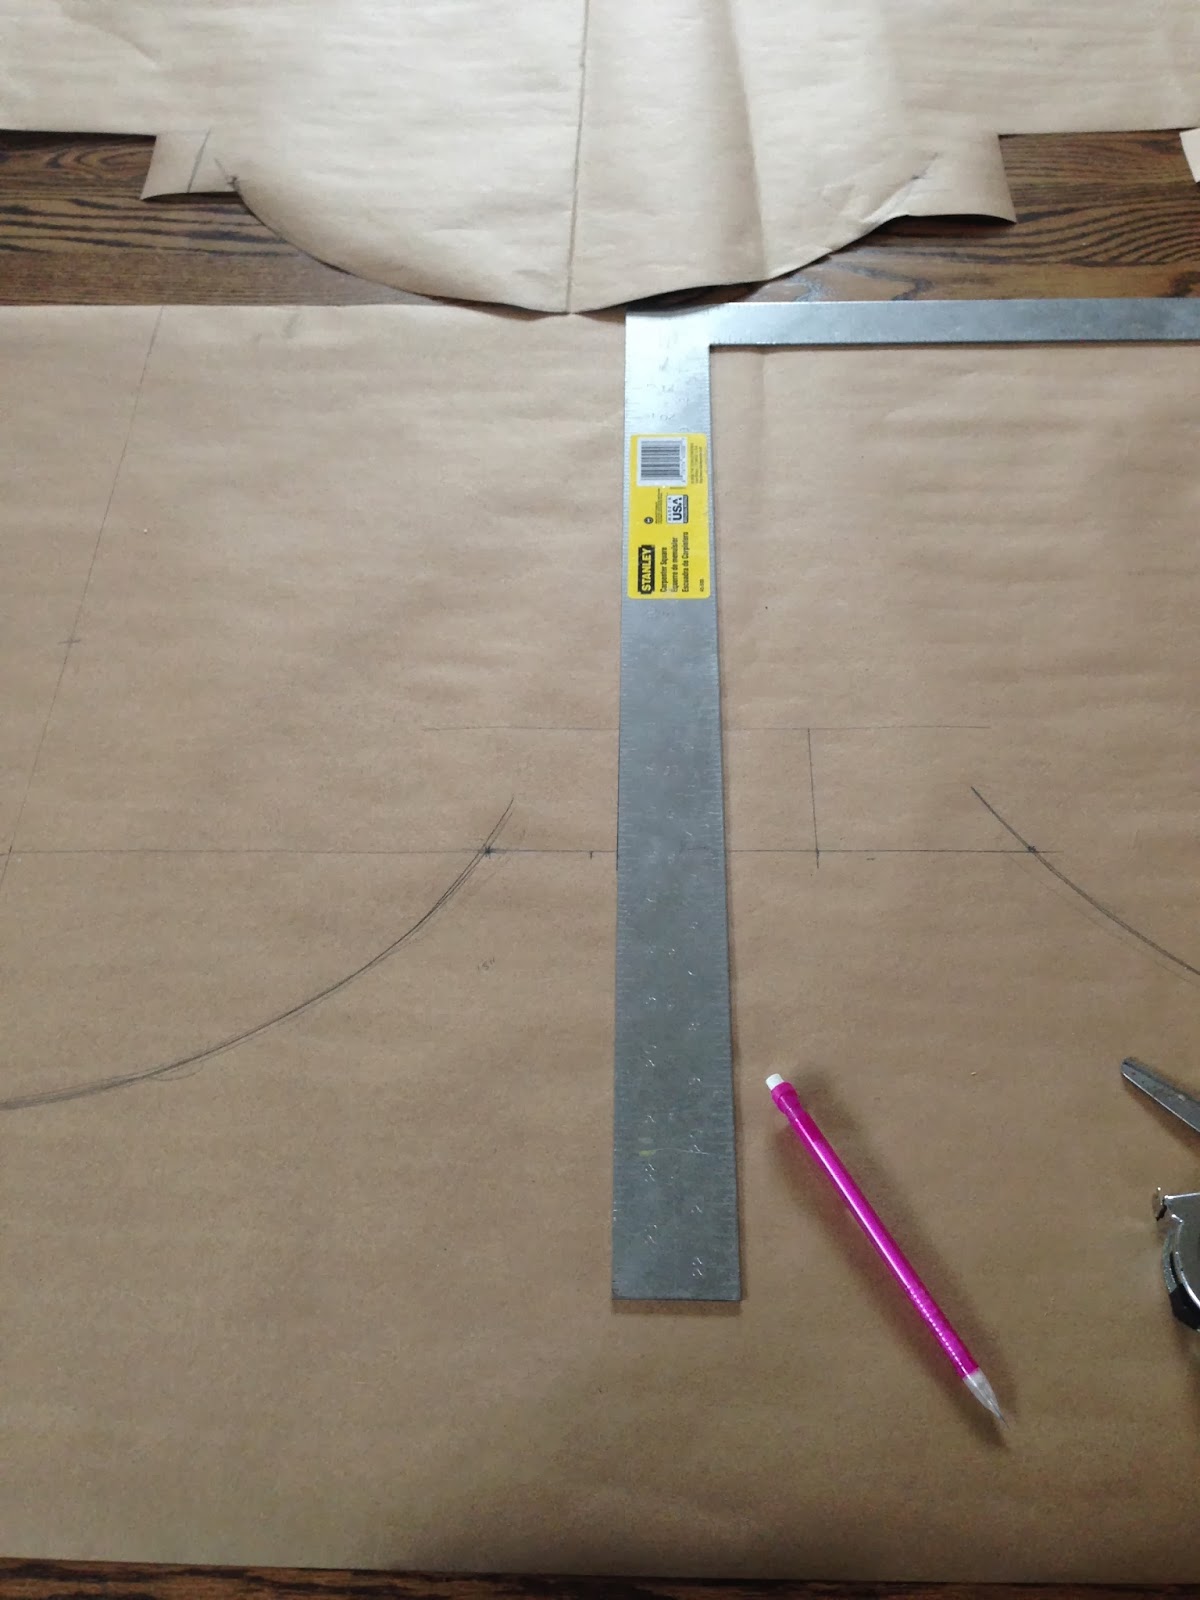
once i had half of the markings for half of the template drawn, i folded my paper in half and cut out my pattern.

here is the finished template!

i went to home depot and had then cut some MDF to my final dimensions.
my valance was about 60" wide and 24" long.

next, i traced the template onto my sheet of MDF.
you can see that i left a 3" band at the top for my crown molding to wrap around...i had not taken that into account when i made the template, so i just shifted it down to make room for the molding at the top.

the final traced valance:

we cut our valance with a jig saw...

and then lightly sanded the edges. (before i painted it, i wiped it down with a tack cloth to remove all dust.)

both sides were primed, and then i started laying out the lines with painters tape for my "white trim" band.
i used a paint/primer-in-one in the same color that i used for my crown molding, which was also the same color that i wanted my contrast band to be. that way, after i painted on my valance color, i could just peel off the tape to reveal the contrasting band.
my band was 1" away from the edge of my valance.

i used the square to get my straight lines, which i lightly marked with a pencil, and then laid my tape down on the edge of the line.

i used an exact knife to cut away the excess tape.

the curved areas were a little tricky. i just tried to get the tape to match the contour of the valance.
once the tape was all in place, i used a credit card to press the tape down and seal the edges.

i used "gentlemans gray"by benjamin moore, which is the same color as the vanity.

we decided to wrap the crown molding around the top of the valance, so we left a space for the valance when we installed the crown.

after the wallpaper was installed, we slipped the valance into place and used a nail gun to attached it to the wall and ceiling.


finally, the crown molding was installed on top of the valance. after it was nailed in place, it was caulked, the nail holes were filled with putty, and it was sanded and painted.

and here is the final valance in place with the crown molding on top!


and, as promised, a peek of the finished bathroom!


be sure and check out the valentine link party before it ends on monday!


Oh my goodness, the bathroom is stunning and the valance is amazing. Hugs, Marty
ReplyDeletethanks marty!! :)
DeleteThis is such a cute project! I've never seen a "tub valance" before!
ReplyDeleteWow! That is smokin' hot. Love the tutorial too. M.
ReplyDeletethank you so much!
DeleteThis looks fantastic, well done!!
ReplyDeleteOMG This is sooo gorgeous!!! Please, please share your wallpaper source!!!
ReplyDeletei will be revealing all of the sources for this bathroom in the next day or two! :)
DeleteThank you!!! I am obsessed with that wallpaper.
DeleteAbsolutely amazing!!! I just love your designs! Thanks for sharing!
ReplyDeleteI am seriously dying over this. And how on earth did you ever get this all done in a week?!?! Seriously, SO amazing!!
ReplyDeletethank you sarah! i know--i can't believe we pulled it off either. i am still a little tired! i am too old to go on 4 hours of sleep!
DeleteSo smart! Love the whole look.
ReplyDeleteHi, Autumn! Your girls' bathroom looks beautiful. I would love to hear and see how you hung the plastic shower curtain. Did you hang two, and did you use the same (or a different) rod than you used to hang the decorative curtain?
ReplyDeletetotally great question! i actually hung the "real" shower curtain and the ikea panels from two different rods. i think i will take a picture and add it to this post! i did something similar in gradys bathroom and hung both the functioning shower curtain and the decorative curtains from a double rod.
DeleteWOW. Absolutely beautiful Autumn!! I am in love!! Great job, friend!
ReplyDeletethanks beth! i am SO happy to finally have a house to DECORATE for real!
Deleteok. looks amazing! i love that custom balance...makes the bathroom look so luxurious. i love that you never overlook even the smallest of details, and your designs show it.
ReplyDeletethank you SO much! that may be my most favorite compliment ever. :)
ReplyDelete